Multi monitor support for BrightSign Players with multiple video outputs
The XC2055, XC4055 and XT2145 BrightSign players have multiple independent video outputs. This document explains how to configure your BrightSign device to drive multiple video outputs using Omnivex Ink.
In order to use Omnivex Ink to drive multiple outputs on a BrightSign device, some changes need to be made to the autorun.brs file in order for the BrightSign device to boot up with the correct configuration.
The creation of the video object to be displayed can be found on line 32 of the autorun.brs. It must be configured to show on multiple monitors as opposed to a single monitor. The following code:
gaa.vm = CreateObject("roVideoMode")
gaa.vm.setMode("auto")
must be replaced with different code. There are two options for replacing the code depending on your preference. Both options are detailed below as follows:
Option 1:
Setting up 2 horizontal 1920 x 1080 screens (i.e. screens side by side)
gaa.vm=CreateObject("roVideoMode")
sm=gaa.vm.GetScreenModes()
HDMI 1 should be setup for 1920 x 1080 screen with horizontal setup. If the screens have bezels, you will need to compensate for the space represented by the bezel by adding to the pixel count. This is called bezel compensation and can be added to the x and y values accordingly.
For example, if x is 1920 and the bezel compensation is 20 px then this value becomes 1920 + 20 = 1940.
sm[0].video_mode="1920x1080x60p"
sm[0].transform = "normal"
sm[0].display_x=0
sm[0].display_y=0
sm[0].enabled=true
HDMI 2 should be setup for 1920 x 1080 screen with horizontal setup. For the horizontal setup, x needs to be adjusted to the screen size. In this current example, x = 1920.
sm[1].video_mode="1920x1080x60p"
sm[1].transform = "normal"
sm[1].display_x=1920
sm[1].display_y=0 ' Bezel compensation of 20 pixels
sm[1].enabled=true
HDMI 3 should be disabled in this example as there are only two screens.
sm[2].enabled=false
HDMI 4 is disabled. if you have 4 screen setup, adopt the above code with correct x value
sm[3].enabled=false
Setting up 3 horizontal 1920 x 1080 screens (i.e. screens side by side)
gaa.vm=CreateObject("roVideoMode")
sm = gaa.vm.GetScreenModes()
HDMI 1 should be setup for 1920 x 1080 screen with horizontal setup.
sm[0].video_mode="1920x1080x60p"
sm[0].transform = "normal"
sm[0].display_x=0
sm[0].display_y=0
sm[0].enabled=true
HDMI 2 should be setup for 1920 x 1080 screen with horizontal setup. For the horizontal setup, x needs to be adjusted to the screen size. In this current example, x = 1920.
sm[1].video_mode="1920x1080x60p"
sm[1].transform = "normal"
sm[1].display_x=1920
sm[1].display_y=0
sm[1].enabled=true
HDMI 3 should be setup for 1920 x 1080 screen with horizontal setup. For the horizontal setup, x needs to be adjusted to the screen size. In this current example, x = 1920 + 1920 = 3840.
sm[2].video_mode="1920x1080x60p"
sm[2].transform = "normal"
sm[2].display_x=3840
sm[2].display_y=0
sm[2].enabled=true
HDMI 4 is disabled.
sm[3].enabled=false
Note: For a 4 screen setup, adopt the above code in HDMI 3 with correct x value to compensate for the preceding screens including bezel compensation.
Setting up 2 vertical 1920 x 1080 screens (i.e. screens stacked one on top of the other)
gaa.vm=CreateObject("roVideoMode")
sm = gaa.vm.GetScreenModes()
HDMI 1 should be setup for 1920 x 1080 screen with vertical setup.
sm[0].video_mode="1920x1080x60p"
sm[0].transform = "normal"
sm[0].display_x=0
sm[0].display_y=0
sm[0].enabled=true
HDMI 2 should be setup for 1920 x 1080 screen with vertical setup.
sm[1].video_mode="1920x1080x60p"
sm[1].transform = "normal"
sm[1].display_x=0
sm[1].display_y=1080
sm[1].enabled=true
HDMI 3 and 4 should be disabled.
sm[2].enabled=false
sm[3].enabled=false
Option 2:
gaa.vm = CreateObject("roVideoMode")
‘Multi-Screen mode Section
hdmi1={ name: "HDMI-1", video_mode: "Modeline 1920x1080x60p 173.00 1920 2048 2248 2576 1080 1083 1088 1120 -hsync +vsync", transform:"normal", display_x: 0, display_y: 0, enabled: true }
hdmi2={ name: "HDMI-2", video_mode: "Modeline 1920x1080x60p 173.00 1920 2048 2248 2576 1080 1083 1088 1120 -hsync +vsync", transform:"normal", display_x: 1920, display_y: 0, enabled: true }
' hdmi3={ name: "HDMI-3", video_mode: "Modeline 1360x768x60p 85.50 1360 1424 1536 1792 768 771 777 795 +hsync +vsync", transform:"normal", display_x: 0, display_y: 1080, enabled: true }
' hdmi4={ name: "HDMI-4", video_mode: "Modeline 1360x768x60p 85.50 1360 1424 1536 1792 768 771 777 795 +hsync +vsync", transform:"normal", display_x: 1920, display_y: 1080, enabled: true }
gaa.vm.SetScreenModes([hdmi1, hdmi2])
In the above example, two 1920 x 1080 HDMI inputs being controlled by the BrightSign device. To add more just remove the ' at the beginning of the hdmi3 and hdmi4 lines and add them to the array on the last line.
The important thing to note here is the video_mode parameter inside of the HDMI object. It is referred to as a "modeline" configuration. If you would like more documentation regarding modeline, please refer to this link: https://en.wikipedia.org/wiki/XFree86_Modeline .
To configure different outputs for displays you will need to pass in a different modeline (in the case of a 4k display it will have different values).
Save this file and put it on the root of the BrightSign sd card. If you did this correctly, you will see that the output of the BrightSign display is now spanned across 2 displays (in the above example).
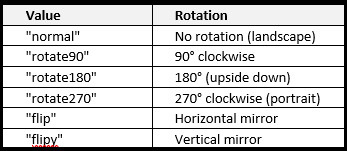
Note there are different values for the Transform property as listed in the following chart:
Omnivex Ink App Setup for Multiple Screens
No matter how many screens you want to setup with the BrightSign device, you will need to setup one Omnivex Ink App and divide it across the screens accordingly. It is important to arrange your App according to the dimensions of the total configuration of your screens.
Below you will see two different examples of how you will build your App depending on the configuration of your screens being driven by the BrightSign device.
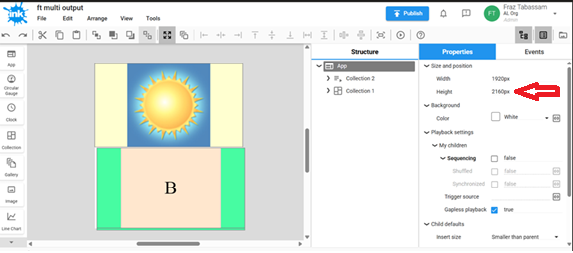
Example 1: Stacked Setup (Vertical)
In order to have 2 screens setup vertically with one on top of the other, you will create a single App with both outputs setup using the same configuration.
Below is an example of an Ink App configured for 2 screens stacked on top of one another. As we are setting up 2 screens 1920 x 1080 vertically, we need to set the height of the App to twice the height of one screen (1080 + 1080 = 2160).
Once this App gets assigned to the BrightSign device which is configured properly in the autorun.brs file as explained above, each screen will show as one collection.
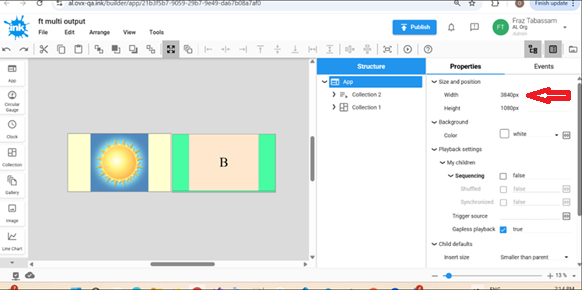
Example 2: Horizontal Setup
In order to have 2 screens setup horizontally with one beside the other, you will create a single App with both outputs setup using the same configuration.
Below is an example of an Ink App configured for 2 screens side by side. As we are setting up 2 screens 1920 x 1080 horizontally, we need to set the width of the App to twice the width of one screen (1920 + 1920 = 3840.
Once this App gets assigned to the BrightSign device which is configured properly in the autorun.brs file as explained above, each screen will show as one collection.