Summary
You want to use a video file with a transparent background as content in Moxie but you must prepare the video in a video editing application before you import it.
Cause
Moxie displays media files using Microsoft Windows Presentation Foundation (WPF) and there are limitations to how video content is rendered. One of these limitations is that WPF does not support transparency. When you create a 32-bit, 4-channel video with red, green, blue and alpha channels, WPF ignores the alpha channel. Because of this, the video's transparent layer is not displayed and the video background is a solid color.
Workaround
Background transparency can be achieved when rendering a video file in Moxie by applying the Transparent Masking effect to the media video content. In order to circumvent this rendering limitation, the video content must be prepared in another application in advance of its use in Moxie.
Preparing transparent-background video content in another application prior to use in Moxie:
- Open the original video file in a video editing application.
- Create a new video that:
- has a background with the same background color as the original, preferably black
- has all of its RGB (red, blue and green ) channel values maximized to 255
This creates a video that renders its subject as a white object on a background color.
Note: Render the original and new videos with a common background color. The background color to be transparent does not need to be black but it is recommended because of the high-contrast difference between the white mask and the black background.
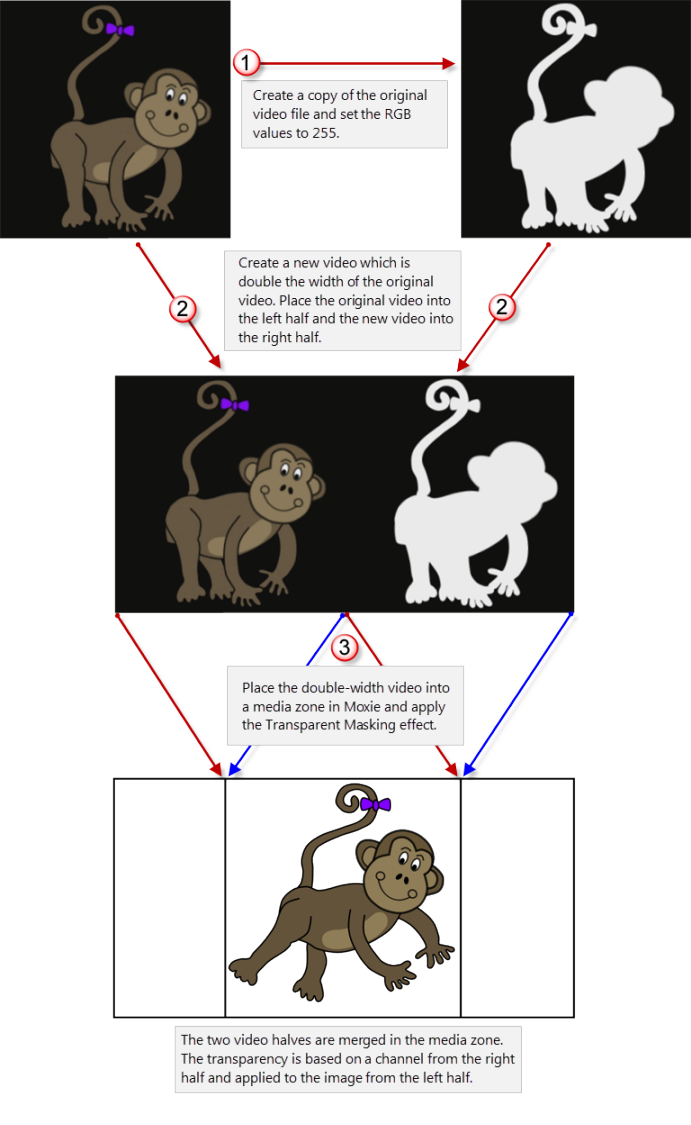
- Create a new canvas for the video that is twice the width of the video.
- Place the original video on the left half of the new, double-width canvas.
- Place the new video with the white subject on the right half of the new, double-width canvas.
- Process the new double-width video and save the file.
Import the new video file into Moxie and apply the Transparent Masking effect:
- Import the new, double-width video file into the Data Server.
- Place the new video media content into a Moxie layout.
- Apply the Zone Effect > Transparent Masking to the media content.
The left and the right halves are merged and the media content background color is rendered as transparent. Notice that the subject shifts position to the right half the full width of the content area. The white subject shifts position half the full width to the left and acts as the alpha channel mask for the original subject.
How it works:
When Moxie applies the Transparent Masking effect to the video, it merges the two halves by layering one image on top of the other. This is why the subject of the video image is shifted to occupy the middle. The white subject, from the right half, acts as a mask on the full color subject on the left half. The common background between both halves is then rendered transparent.

This video transparency method overcomes the transparency limitations of the Windows Presentation Foundation and renders the video as intended.